16.5. သင်ခန်းစာ - ဂျီဩမေတြီ တည်ဆောက်ခြင်း (Lesson: Geometry Construction)
ရိုးရှင်းသောဂျီဩမေတြီများကို SQL ထဲတွင် မည်သို့တည်ဆောက်ရမည်ကို ဤအပိုင်းတွင် ထဲထဲဝင်ဝင်လေ့လာသွားမည်ဖြစ်ပါသည်။ လက်တွေ့တွင် ရှုပ်ထွေးသောဂျီဩမေတြီများကို ဖန်တီးရန် QGIS ကဲ့သို့သော GIS software တစ်ခုကိုအသုံးပြုကောင်းပြုပါလိမ့်မည်- သို့ရာတွင် ဂျီဩမေတြီများ၏ တည်ဆောက်ပုံကိုနားလည်ခြင်းနှင့် database ၏ဖွဲ့စည်းပုံကိုနားလည်ခြင်းသည် query များရေးသားရာ၌ အသုံးဝင်စေနိုင်ပါသည်။
ဤသင်ခန်းစာအတွက် ရည်မှန်းချက်- Spatial entity များကို PostgreSQL/PostGIS ထဲတွင် တိုက်ရိုက်ဖန်တီးနည်းကို ပိုမိုနားလည်စေရန်။
16.5.1. Linestrings ဖန်တီးခြင်း (Creating Linestrings)
address database ကိုပြန်သွားပြီး streets table ကို အခြားအရာများနှင့်ကိုက်ညီအောင် လုပ်ကြည့်ပါမည်- ဆိုလိုသည်မှာ ဂျီဩမေတြီတွင် constraint တစ်ခုရှိပြီး geometry_columns table ထဲတွင် index တစ်ခုနှင့် entry တစ်ခုရှိခြင်းဖြစ်ပါသည်။
16.5.2. မိမိကိုယ်တိုင်ကြိုးစားကြည့်ပါ (Try Yourself:) ★★☆
streets table တွင် ST_LineString အမျိုးအစား ဂျီဩမေတြီ column တစ်ခုပါရှိအောင် မွမ်းမံပြင်ဆင်ပါ။
ဂျီဩမေတြီ columns table တွင် ပူးတွဲ update လုပ်ပေးရန် မမေ့ပါနှင့်။
LINESTRING မဟုတ်သော သို့မဟုတ် null ဖြစ်နေသော ဂျီဩမေတြီများကို ထည့်သွင်းခြင်းမပြုရန် constraint တစ်ခုကိုလည်း ထည့်သွင်းပါ။
ဂျီဩမေတြီ column အသစ်တွင် spatial index တစ်ခုဖန်တီးပါ
အဖြေ
alter table streets add column the_geom geometry;
alter table streets add constraint streets_geom_point_chk check
     (st_geometrytype(the_geom) = 'ST_LineString'::text OR the_geom IS NULL);
insert into geometry_columns values ('','public','streets','the_geom',2,4326,
     'LINESTRING');
create index streets_geo_idx
  on streets
  using gist
  (the_geom);
ယခုအခါ streets table ထဲသို့ linestring တစ်ခုကို ထည့်သွင်းကြည့်ပါမည်။ ဤဥပမာတွင် ရှိနေပြီးသား street record တစ်ခုကို update လုပ်မည်ဖြစ်ပါသည်-
update streets
set the_geom = 'SRID=4326;LINESTRING(20 -33, 21 -34, 24 -33)'
where streets.id=2;
QGIS ထဲတွင် ရလာဒ်များကို ကြည့်ပါ။ (‘Layers’ panel ထဲရှိ streets layer ပေါ်တွင် right-click နှိပ်ပြီး ‘Zoom to layer extent’ ကိုနှိပ်ရန် လိုအပ်ကောင်းလိုအပ်နိုင်ပါသည်။)
ယခုအခါ နောက်ထပ် streets entry များကိုဖန်တီးပါမည် - အချို့ကို QGIS ထဲတွင် ဖန်တီးပြီး အချို့ကို command line မှ ဖန်တီးမည်ဖြစ်ပါသည်။
16.5.3. Polygon များဖန်တီးခြင်း (Creating Polygons)
Polygon များဖန်တီးခြင်းသည် လွယ်ကူပါသည်။ အဓိပ္ပါယ်သတ်မှတ်ချက်အရ Polygon များတွင် အနည်းဆုံး vertex (မျဉ်းအဆစ်) ၄ ခုပါရှိရမည်ဖြစ်ပြီး ပထမဦးဆုံးနှင့် နောက်ဆုံး vertex သည် တစ်နေရာထဲတွင် ရှိနေရမည်ဖြစ်သည်-
insert into cities (name, the_geom)
values ('Tokyo', 'SRID=4326;POLYGON((10 -10, 5 -32, 30 -27, 10 -10))');
Note
Polygon တစ်ခုတွင် ၎င်း၏ကိုဩဒိနိတ် list ကို ကွင်း ( ) နှစ်ခုဖြင့် ရေးသားရန်လိုအပ်ပါသည်၊ ထိုမှသာ ချိတ်ဆက်မှုမရှိသောဧရိယာ များစွာပါဝင်သည့် ရှုပ်ထွေးသော Polygon များကို ထည့်သွင်းနိုင်စေမည်ဖြစ်သည်။ ဥပမာအားဖြင့်-
insert into cities (name, the_geom)
values ('Tokyo Outer Wards',
        'SRID=4326;POLYGON((20 10, 20 20, 35 20, 20 10),
                           (-10 -30, -5 0, -15 -15, -10 -30))'
        );
ဤဥပမာအဆင့်အတိုင်း လုပ်ဆောင်ခဲ့ပါက cities dataset ကို QGIS ထဲသို့ ထည့်သွင်းပြီး attribute table ကိုဖွင့်ကာ အသစ်ထည့်သွင်းထားသော entry ကို select လုပ်ခြင်းအားဖြင့် စစ်ဆေးကြည့်နိုင်ပါသည်။ Polygon အသစ်နှစ်ခုသည် polygon တစ်ခုတည်းကဲ့သို့ လုပ်ဆောင်သည်ကို တွေ့ရပါမည်။
16.5.4. လေ့ကျင့်ခန်း - Cities နှင့် People ကိုချိတ်ဆက်ခြင်း (Exercise: Linking Cities to People)
ဤလေ့ကျင့်ခန်းအတွက် အောက်ပါတို့ကို လုပ်ဆောင်သင့်ပါသည်-
People table မှ data များအားလုံးကို ဖျက်ပစ်ပါ။
Cities table ၏ primary key နှင့် ချိတ်ဆက်မည့် foreign key column တစ်ခုကို People table တွင် ထည့်သွင်းပါ။
အချို့ cities များကို ရယူရန် QGIS ကိုအသုံးပြုပါ။
People record အသစ်များကို ထည့်သွင်းရန် SQL ကိုအသုံးပြုပါ၊ record တစ်ခုချင်းစီတွင် သက်ဆိုင်ရာ street နှင့် city တစ်ခုစီပါရှိအောင် ထည့်သွင်းပါ။
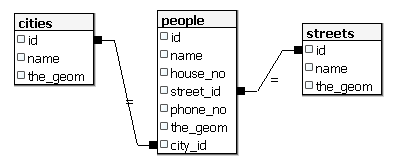
Update ပြုလုပ်ထားသော People schema သည် အောက်ပါပုံစံအတိုင်း ဖြစ်သင့်ပါသည်-
\d people

Table "public.people"
   Column   |         Type          |                      Modifiers
 -----------+-----------------------+--------------------------------------------
  id        | integer               | not null
            |                       | default nextval('people_id_seq'::regclass)
  name      | character varying(50) |
  house_no  | integer               | not null
  street_id | integer               | not null
  phone_no  | character varying     |
  the_geom  | geometry              |
  city_id   | integer               | not null
Indexes:
  "people_pkey" PRIMARY KEY, btree (id)
  "people_name_idx" btree (name)
Check constraints:
  "people_geom_point_chk" CHECK (st_geometrytype(the_geom) =
                       'ST_Point'::text OR the_geom IS NULL)
Foreign-key constraints:
  "people_city_id_fkey" FOREIGN KEY (city_id) REFERENCES cities(id)
  "people_street_id_fkey" FOREIGN KEY (street_id) REFERENCES streets(id)
အဖြေ
delete from people;
alter table people add column city_id int not null references cities(id);
(QGIS ထဲတွင် cities များရယူခြင်း)
insert into people (name,house_no, street_id, phone_no, city_id, the_geom)
   values ('Faulty Towers',
           34,
           3,
           '072 812 31 28',
           1,
           'SRID=4326;POINT(33 33)');

insert into people (name,house_no, street_id, phone_no, city_id, the_geom)
   values ('IP Knightly',
           32,
           1,
           '071 812 31 28',
           1,F
           'SRID=4326;POINT(32 -34)');

insert into people (name,house_no, street_id, phone_no, city_id, the_geom)
   values ('Rusty Bedsprings',
           39,
           1,
           '071 822 31 28',
           1,
           'SRID=4326;POINT(34 -34)');
အောက်ပါ error message ကိုရရှိပါက-
ERROR:  insert or update on table "people" violates foreign key constraint
        "people_city_id_fkey"
DETAIL: Key (city_id)=(1) is not present in table "cities".
၎င်း error message ၏ဆိုလိုရင်းမှာ cities table အတွက် polygon များဖန်တီးစဉ်တွင် polygon အချို့ကို ဖျက်ပစ်ရမည်ဖြစ်ပြီး ပြန်လည်စတင်ရမည်ဟု ဆိုလိုပါသည်။ Cities table ထဲရှိ entry များကို စစ်ဆေးပြီး ရှိနေပြီးသား id တစ်ခုခုကို အသုံးပြုပါ။
16.5.5. Schema ကို ကြည့်ခြင်း (Looking at Our Schema)
ယခုအခါ schema သည် အောက်ပါပုံစံအတိုင်း ဖြစ်သင့်ပါသည်-
16.5.6. မိမိကိုယ်တိုင်ကြိုးစားကြည့်ပါ (Try Yourself:) ★★★
City တစ်ခုအတွက် address များအားလုံး၏ minimum convex hull ကိုတွက်ချက်ပြီး အဆိုပါဧရိယာပတ်လည်တွင် buffer တစ်ခုတွက်ချက်ခြင်းအားဖြင့် city နယ်နိမိတ်များကို ဖန်တီးပါ။
16.5.7. Object အခွဲများကို ရယူသုံးစွဲခြင်း (Access Sub-Objects)
SFS-Model function များတွင် SFS ဂျီဩမေတြီများ၏ object အခွဲများကို ရယူသုံးစွဲရန် option မျိုးစုံရှိပါသည်။ myPolygonTable ထဲရှိ polygon ဂျီဩမေတြီအတိုင်း၏ ပထမဆုံး vertex point ကို select ပြုလုပ်လိုပါက အောက်ပါနည်းအတိုင်း လုပ်ဆောင်ရပါမည်-
Polygon နယ်နိမိတ်ကို linestring တစ်ခုအဖြစ်သို့ ပြောင်းလဲပါ-
select st_boundary(geometry) from myPolygonTable;
ရရှိလာသော linestring ၏ ပထမဆုံး vertex point ကို select လုပ်ပါ-
select st_startpoint(myGeometry)
from (
    select st_boundary(geometry) as myGeometry
    from myPolygonTable) as foo;
16.5.8. Data Processing
PostGIS သည် OGC SFS/MM စံနှုန်းနှင့်ကိုက်ညီသော function များအားလုံးကို ပံ့ပိုးပေးထားပါသည်။ အဆိုပါ function များအားလုံးသည် ST_ ဟူသောစာလုံးဖြင့် စတင်ပါသည်။
16.5.9. ဖြတ်တောက်ခြင်း (Clipping)
Data ၏ အပိုင်းခွဲတစ်ခုကို clip ပြုလုပ်ရန် ST_INTERSECT() function ကိုအသုံးပြုနိုင်ပါသည်။ ဗလာဖြစ်နေသော ဂျီဩမေတြီများ မဖြစ်စေရန် အောက်ပါကို အသုံးပြုပါ-
where not st_isempty(st_intersection(a.the_geom, b.the_geom))
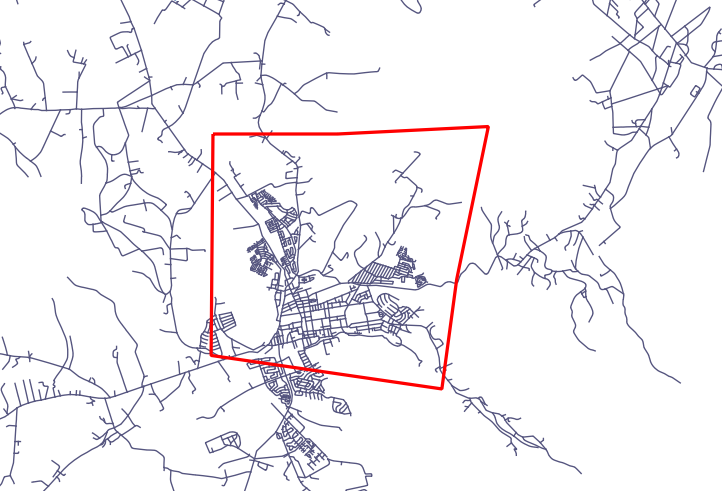
select st_intersection(a.the_geom, b.the_geom), b.*
from clip as a, road_lines as b
where not st_isempty(st_intersection(st_setsrid(a.the_geom,32734),
  b.the_geom));

16.5.10. အခြား ဂျီဩမေတြီများကိုအသုံးပြုပြီး ဂျီဩမေတြီများတည်ဆောက်ခြင်း (Building Geometries from Other Geometries)
Point table တစ်ခုမှ linestring တစ်ခုထုတ်ယူလိုပါသည်။ Point များ၏ order ကို id ဖြင့်သတ်မှတ်ထားပါသည်။ အခြား order စဉ်သည့်နည်းလမ်းသည် GPS ဖြင့် waypoint များကို ရယူသည့် timestamp (အချိန်) ဖြင့် စီခြင်းဖြစ်သည်။
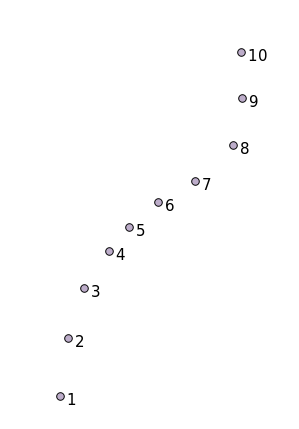
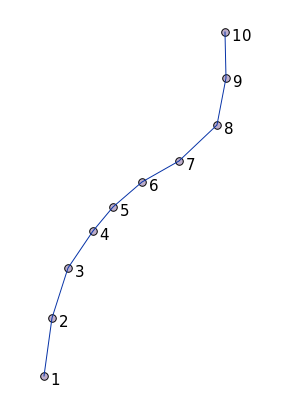
‘points’ ဟုခေါ်သော point layer အသစ်တစ်ခုမှ linestring တစ်ခုကို ဖန်တီးရန် အောက်ပါ command ကို run နိုင်ပါသည်-
select ST_LineFromMultiPoint(st_collect(the_geom)), 1 as id
from (
  select the_geom
  from points
  order by id
) as foo;
Layer အသစ်တစ်ခုမဖန်တီးပဲ ၎င်း၏အလုပ်လုပ်ပုံကို ကြည့်ရှုရန် ‘people’ layer ပေါ်တွင်လည်း ထို command ကို run ကြည့်နိုင်ပါသည်။
16.5.11. ဂျီဩမေတြီ သန့်ခြင်း (Geometry Cleaning)
ဤခေါင်းစဉ်အတွက် အချက်အလက်များကို ဤ blog တွင် ဖတ်ရှုနိုင်ပါသည်။
16.5.12. Table များအကြား ကွာခြားချက် (Differences between tables)
တည်ဆောက်ပုံတူညီသော table နှစ်ခုအကြား ကွာခြားချက်ကို သိရှိနိုင်စေရန် PostgreSQL keyword ဖြစ်သော EXCEPT ကိုအသုံးပြုနိုင်ပါသည်-
select * from table_a
except
select * from table_b;
ရလာဒ်အနေဖြင့် table_b တွင်မသိမ်းဆည်းထားသော table_a မှ record များအားလုံးကို ရရှိမည်ဖြစ်သည်။
16.5.13. Tablespaces
Postgres သည် ၎င်း၏ data များကို ကွန်ပျူတာရှိ မည်သည့်နေရာတွင် သိမ်းဆည်းသင့်သည်ကို Tablespace များဖန်တီးခြင်းဖြင့် သတ်မှတ်ပေးနိုင်ပါသည်-
CREATE TABLESPACE homespace LOCATION '/home/pg';
Database တစ်ခုကိုဖန်တီးသောအခါ အသုံးပြုမည့် tablespace ကို သတ်မှတ်ပေးနိုင်ပါသည်၊ ဥပမာ-:
createdb --tablespace=homespace t4a
16.5.14. နိဂုံးချုပ် (In Conclusion)
PostGIS statement များကိုအသုံးပြုပြီး ပိုမိုရှုပ်ထွေးသော ဂျီဩမေတြီများကို မည်ကဲ့သို့ဖန်တီးရမည်ကို လေ့လာခဲ့ပြီးဖြစ်ပါသည်။ GIS ကိုအသုံးပြုပြီး ပထဝီဝင်ဆိုင်ရာ database များဖြင့် အလုပ်လုပ်သောအခါ သင့်တွင်ရှိသော ဗဟုသုတကို တိုးတက်စေရန်ဖြစ်ပါသည်။ အဆိုပါ statement များကို အမြဲတမ်း လက်ဖြင့် ရိုက်ထည့်ရန်မလိုအပ်ပါ။ သို့သော် ၎င်းတို့၏တည်ဆောက်ပုံကို ယေဘုယျနားလည်ခြင်းသည် GIS အသုံးပြုသောအခါ၊ အထူးသဖြင့် error များကြုံတွေ့ရပါက အကူအညီဖြစ်စေပါသည်၊ ထိုသို့မဟုတ်ပါက error များကိုနားလည်ရခက်နေပေလိမ့်မည်။