16.4. သင်ခန်းစာ - Spatial Query များ (Lesson: Spatial Queries)
Spatial query များသည် အခြား database query များနှင့်အတူတူပင်ဖြစ်ပါသည်။ အခြား database column တစ်ခုခုကဲ့သို့ ဂျီဩမေတြီ column ကိုအသုံးပြုနိုင်ပါသည်။ Database ထဲတွင် PostGIS ကို install ပြုလုပ်ခြင်းအားဖြင့် database ကို query ပြုလုပ်ရန် ထပ်ဆောင်း function များ ရရှိမည်ဖြစ်ပါသည်။
ဤသင်ခန်းစာအတွက် ရည်မှန်းချက်- Spatial function များကို “ပုံမှန်” non-spatial function များနည်းတူ မည်သို့အကောင်အထည်ဖော်ရမည်ကို လေ့လာရန်။
16.4.1. Spatial Operators
Point(X,Y) ၏ ၂ ဒီဂရီအကွာအဝေးအတွင်းတွင် ရှိသော point များကိုသိလိုသောအခါ အောက်ပါအတိုင်း လုပ်ဆောင်နိုင်ပါသည်-
select *
from people
where st_distance(the_geom,'SRID=4326;POINT(33 -34)') < 2;
ရလာဒ်-
 id |     name     | house_no | street_id |   phone_no    |   the_geom
----+--------------+----------+-----------+---------------+---------------
  6 | Fault Towers |       34 |         3 | 072 812 31 28 | 01010008040C0
(1 row)
Note
အထက်တွင်ပြထားသော the_geom တန်ဖိုးကို စာမျက်နှာပေါ်တွင် နေရာရစေရန် ဂဏန်းဖြတ်တိထားပါသည်။ Point ကို လူဖတ်ရှုနိုင်သော ကိုဩဒိနိတ်များဖြင့် မြင်တွေ့လိုလျှင် “View a point as WKT” အပိုင်းတွင် ပြုလုပ်ခဲ့သည့်အတိုင်း လုပ်ဆောင်ကြည့်ပါ။
အထက်ပါ query သည် ၂ ဒီဂရီ အတွင်းရှိ point များအားလုံးကို ပြန်ထုတ်ပေးသည်ကို မည်သို့သိရှိနိုင်မလဲ? ဘာကြောင့် ၂ မီတာ မဖြစ်သလဲ? သို့မဟုတ် အခြား ယူနစ်တစ်ခုခုရော မဖြစ်နိုင်ဘူးလား?
အဖြေ
ဥပမာပြထားသော query တွင် အသုံးပြုထားသော ယူနစ်များသည် ဒီဂရီများဖြစ်ပါသည်၊ အဘယ်ကြောင့်ဆိုသော် layer ၏ CRS သည် WGS 84 ဖြစ်နေသောကြောင့်ဖြစ်သည်။ ၎င်းသည် Geographic CRS တစ်ခုဖြစ်သောကြောင့် ၎င်း၏ ယူနစ်များသည် ဒီဂရီများဖြစ်ကြပါသည်။ UTM projection များကဲ့သို့ Projected CRS တွင် ယူနစ်များသည် မီတာ ဖြစ်ကြပါသည်။
Query တစ်ခုရေးသားသောအခါ layer ၏ CRS သည် မည်သည့်ယူနစ်ဖြစ်သည်ကို သိရှိရန် လိုအပ်ပါသည်။ သို့မှသာ လိုချင်သောရလာဒ်ပြန်ထုတ်ပေးနိုင်သည့် query တစ်ခုကို ရေးသားနိုင်မည်ဖြစ်သည်။
16.4.2. တည်နေရာဆိုင်ရာ အညွှန်းကိန်းများ (Spatial Indexes)
Spatial index များကိုလည်း သတ်မှတ်ပေးနိုင်ပါသည်။ Spatial index တစ်ခုသည် spatial query များကို ပိုမိုမြန်ဆန်စေပါသည်။ ဂျီဩမေတြီ column တွင် spatial index တစ်ခုဖန်တီးရန် အောက်ပါကို အသုံးပြုပါ-
CREATE INDEX people_geo_idx
  ON people
  USING gist
  (the_geom);

\d people
ရလာဒ်-
Table "public.people"
   Column   |         Type          |                Modifiers
 -----------+-----------------------+----------------------------------------
  id        | integer               | not null default
            |                       | nextval('people_id_seq'::regclass)
  name      | character varying(50) |
  house_no  | integer               | not null
  street_id | integer               | not null
  phone_no  | character varying     |
  the_geom  | geometry              |
Indexes:
  "people_pkey" PRIMARY KEY, btree (id)
  "people_geo_idx" gist (the_geom)  <-- new spatial key added
  "people_name_idx" btree (name)
Check constraints:
  "people_geom_point_chk" CHECK (st_geometrytype(the_geom) = 'ST_Point'::text
  OR the_geom IS NULL)
Foreign-key constraints:
  "people_street_id_fkey" FOREIGN KEY (street_id) REFERENCES streets(id)
16.4.3. မိမိကိုယ်တိုင်ကြိုးစားကြည့်ပါ (Try Yourself:) ★★☆
cities table ၏ ဂျီဩမေတြီ column တွင် spatial အရ index ပါဝင်စေရန် မွမ်းမံပြင်ဆင်ပါ။
အဖြေ
CREATE INDEX cities_geo_idx
  ON cities
  USING gist (the_geom);
16.4.4. PostGIS Spatial Function များသရုပ်ပြသခြင်း (PostGIS Spatial Functions Demo)
PostGIS Spatial Function များကို သရုပ်ပြသရန် စိတ်ကူးယဉ် (fictional) data အချို့ပါဝင်သော database အသစ်တစ်ခုကို ဖန်တီးပါမည်။
Database အသစ်တစ်ခုကို ဖန်တီးပါ (psql shell မှ ဦးစွာ ထွက်ပါ)-
createdb postgis_demo
PostGIS extension များကို install လုပ်ရန် မမေ့ပါနှင့်-
psql -d postgis_demo -c "CREATE EXTENSION postgis;"
exercise_data/postgis/ ဖိုင်လမ်းကြောင်းထဲတွင် ပေးထားသော data များကို ထည့်သွင်းပါ။ ထည့်သွင်းနည်းများကို ယခင်သင်ခန်းစာတွင် ပြန်ကြည့်ပါ၊ Database အသစ်တွင် PostGIS connection အသစ်တစ်ခုဖန်တီးရန် လိုအပ်သည်ကို မမေ့ပါနှင့်။ Terminal သို့မဟုတ် DB Manager မှတဆင့် ထည့်သွင်းနိုင်ပါသည်။ အောက်ပါ database table များထဲသို့ ဖိုင်များကို ထည့်သွင်းပါ-
points.shp ကို building ထဲသို့
lines.shp ကို road ထဲသို့
polygons.shp ကို region ထဲသို့
အဆိုပါ database layer ၃ ခုကို Add PostGIS Layers dialog မှတဆင့် QGIS ထဲသို့ ထည့်သွင်းပါ။ ထို layer များ၏ attribute ဇယားကို ဖွင့်ကြည့်သောအခါ PostGIS import မှဖန်တီးထားသော id field တစ်ခုနှင့် gid field တစ်ခု ပါရှိနေသည်ကို တွေ့ရပါလိမ့်မည်။
ယခုအခါ table များကို ထည့်သွင်းပြီးဖြစ်ကာ data ကို query ပြုလုပ်ရန် PostGIS ကို အသုံးပြုနိုင်ပြီဖြစ်ပါသည်။ Terminal (command line) သို့ပြန်သွားပြီး အောက်ပါကို ရိုက်ထည့်ပြီး run ပါ:
psql postgis_demo
Select statement အချို့မှ view များဖန်တီးခြင်းဖြင့် သရုပ်ပြသသွားမည်ဖြစ်ပါသည်၊ ၎င်းရလာဒ်များကို QGIS ထဲတွင် ဖွင့်ကြည့်နိုင်မည် ဖြစ်ပါသည်။
တည်နေရာဖြင့် ရွေးချယ်ခြင်း (Select by location)
KwaZulu region ရှိ အဆောက်အဦများအားလုံးကို ရယူပါ-
SELECT a.id, a.name, st_astext(a.the_geom) as point
  FROM building a, region b
    WHERE st_within(a.the_geom, b.the_geom)
    AND b.name = 'KwaZulu';
ရလာဒ်-
 id | name |                  point
----+------+------------------------------------------
 30 | York | POINT(1622345.23785063 6940490.65844485)
 33 | York | POINT(1622495.65620524 6940403.87862489)
 35 | York | POINT(1622403.09106394 6940212.96302097)
 36 | York | POINT(1622287.38463732 6940357.59605424)
 40 | York | POINT(1621888.19746548 6940508.01440885)
(5 rows)
သို့မဟုတ် view တစ်ခုဖန်တီးပါက-
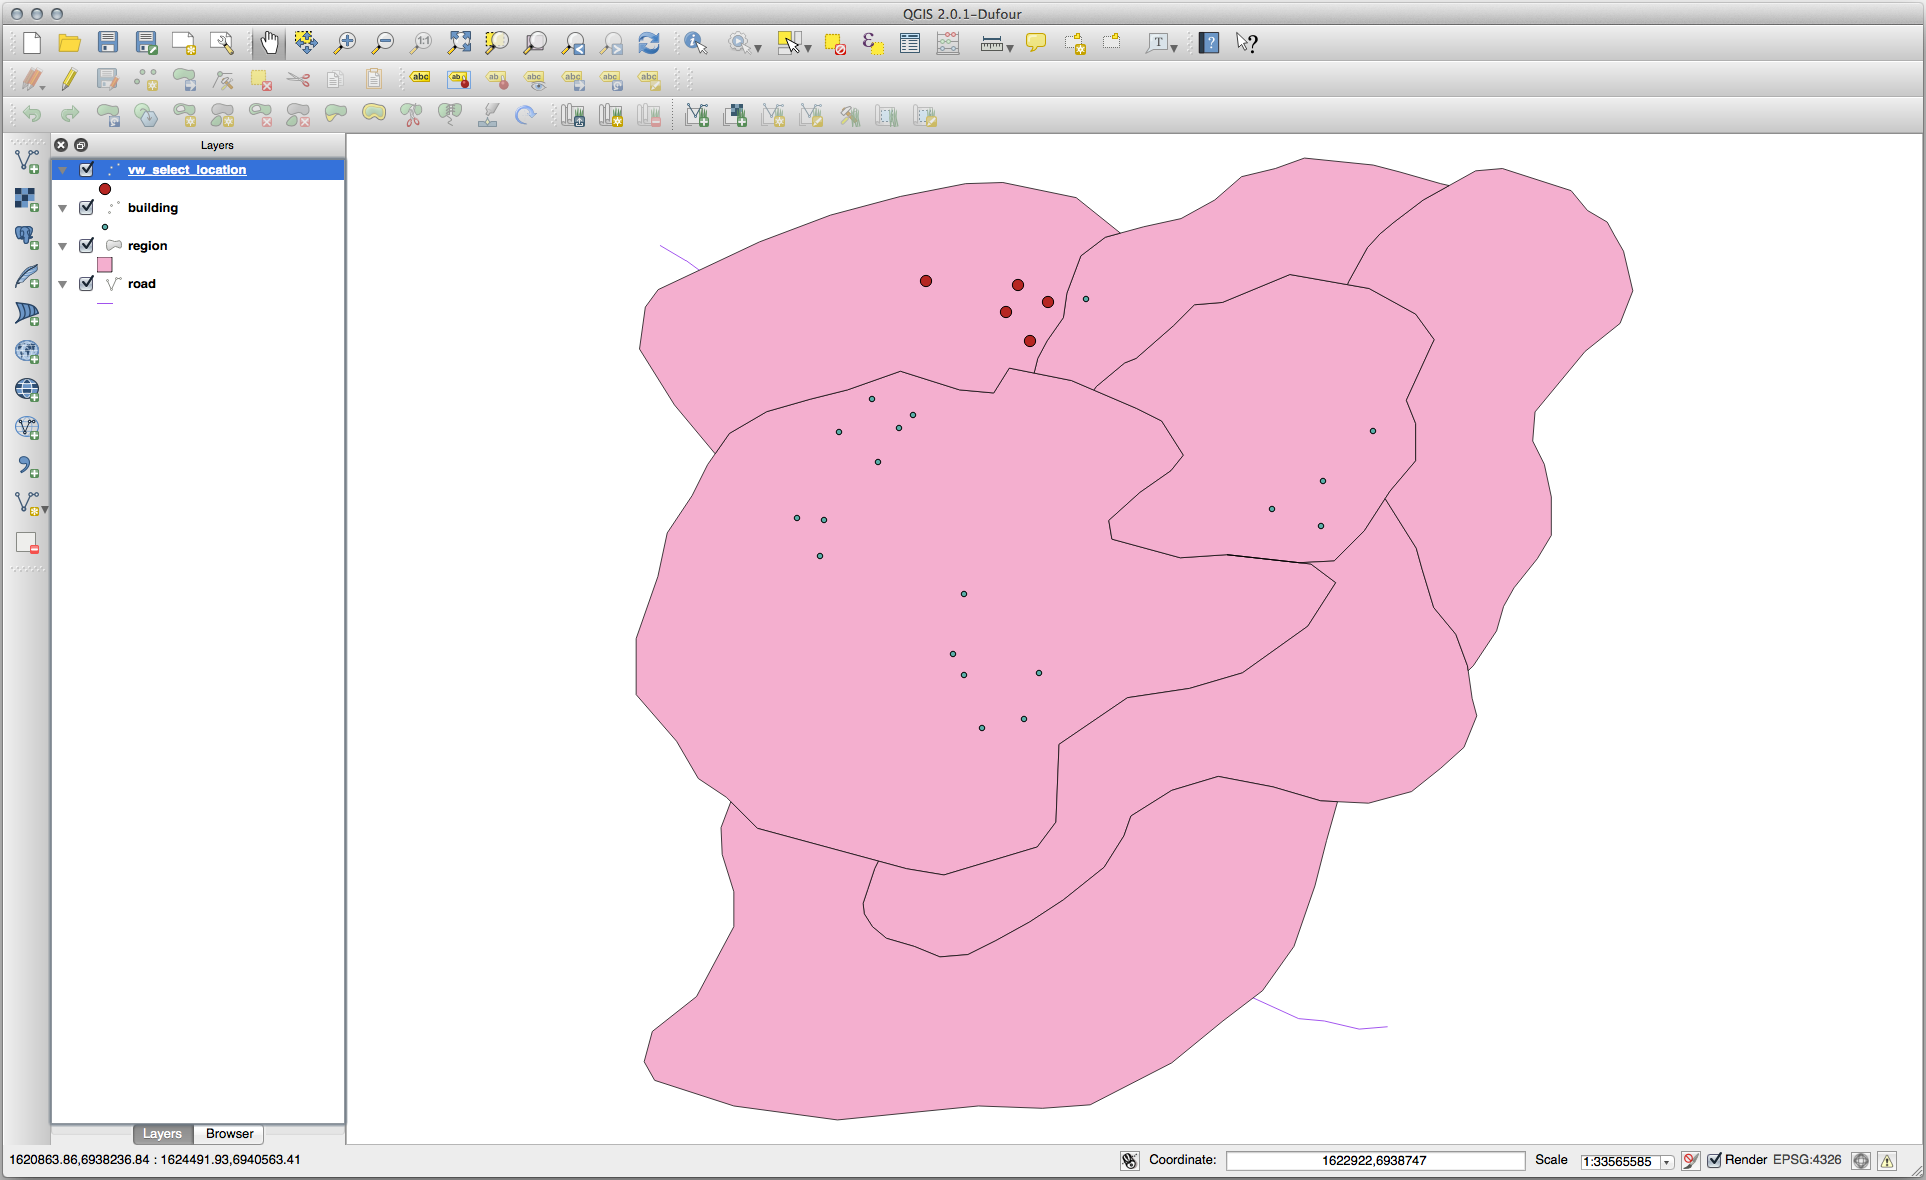
CREATE VIEW vw_select_location AS
  SELECT a.gid, a.name, a.the_geom
    FROM building a, region b
      WHERE st_within(a.the_geom, b.the_geom)
      AND b.name = 'KwaZulu';
View ကို layer အနေဖြင့် ထည့်သွင်းပြီး QGIS ထဲတွင် ကြည့်ရှုပါ-
အနီးအနားရှိအရာများကို ရွေးချယ်ခြင်း (Select neighbors)
Hokkaido region နှင့်ဆက်နေသော region နာမည်များအားလုံး၏ စာရင်းကို ပြသပါ-
SELECT b.name
  FROM region a, region b
    WHERE st_touches(a.the_geom, b.the_geom)
    AND a.name = 'Hokkaido';
ရလာဒ်-
    name
--------------
 Missouri
 Saskatchewan
 Wales
(3 rows)
View တစ်ခုအနေဖြင့်-
CREATE VIEW vw_regions_adjoining_hokkaido AS
  SELECT b.gid, b.name, b.the_geom
    FROM region a, region b
      WHERE st_touches(a.the_geom, b.the_geom)
      AND a.name = 'Hokkaido';
QGIS ထဲတွင်-
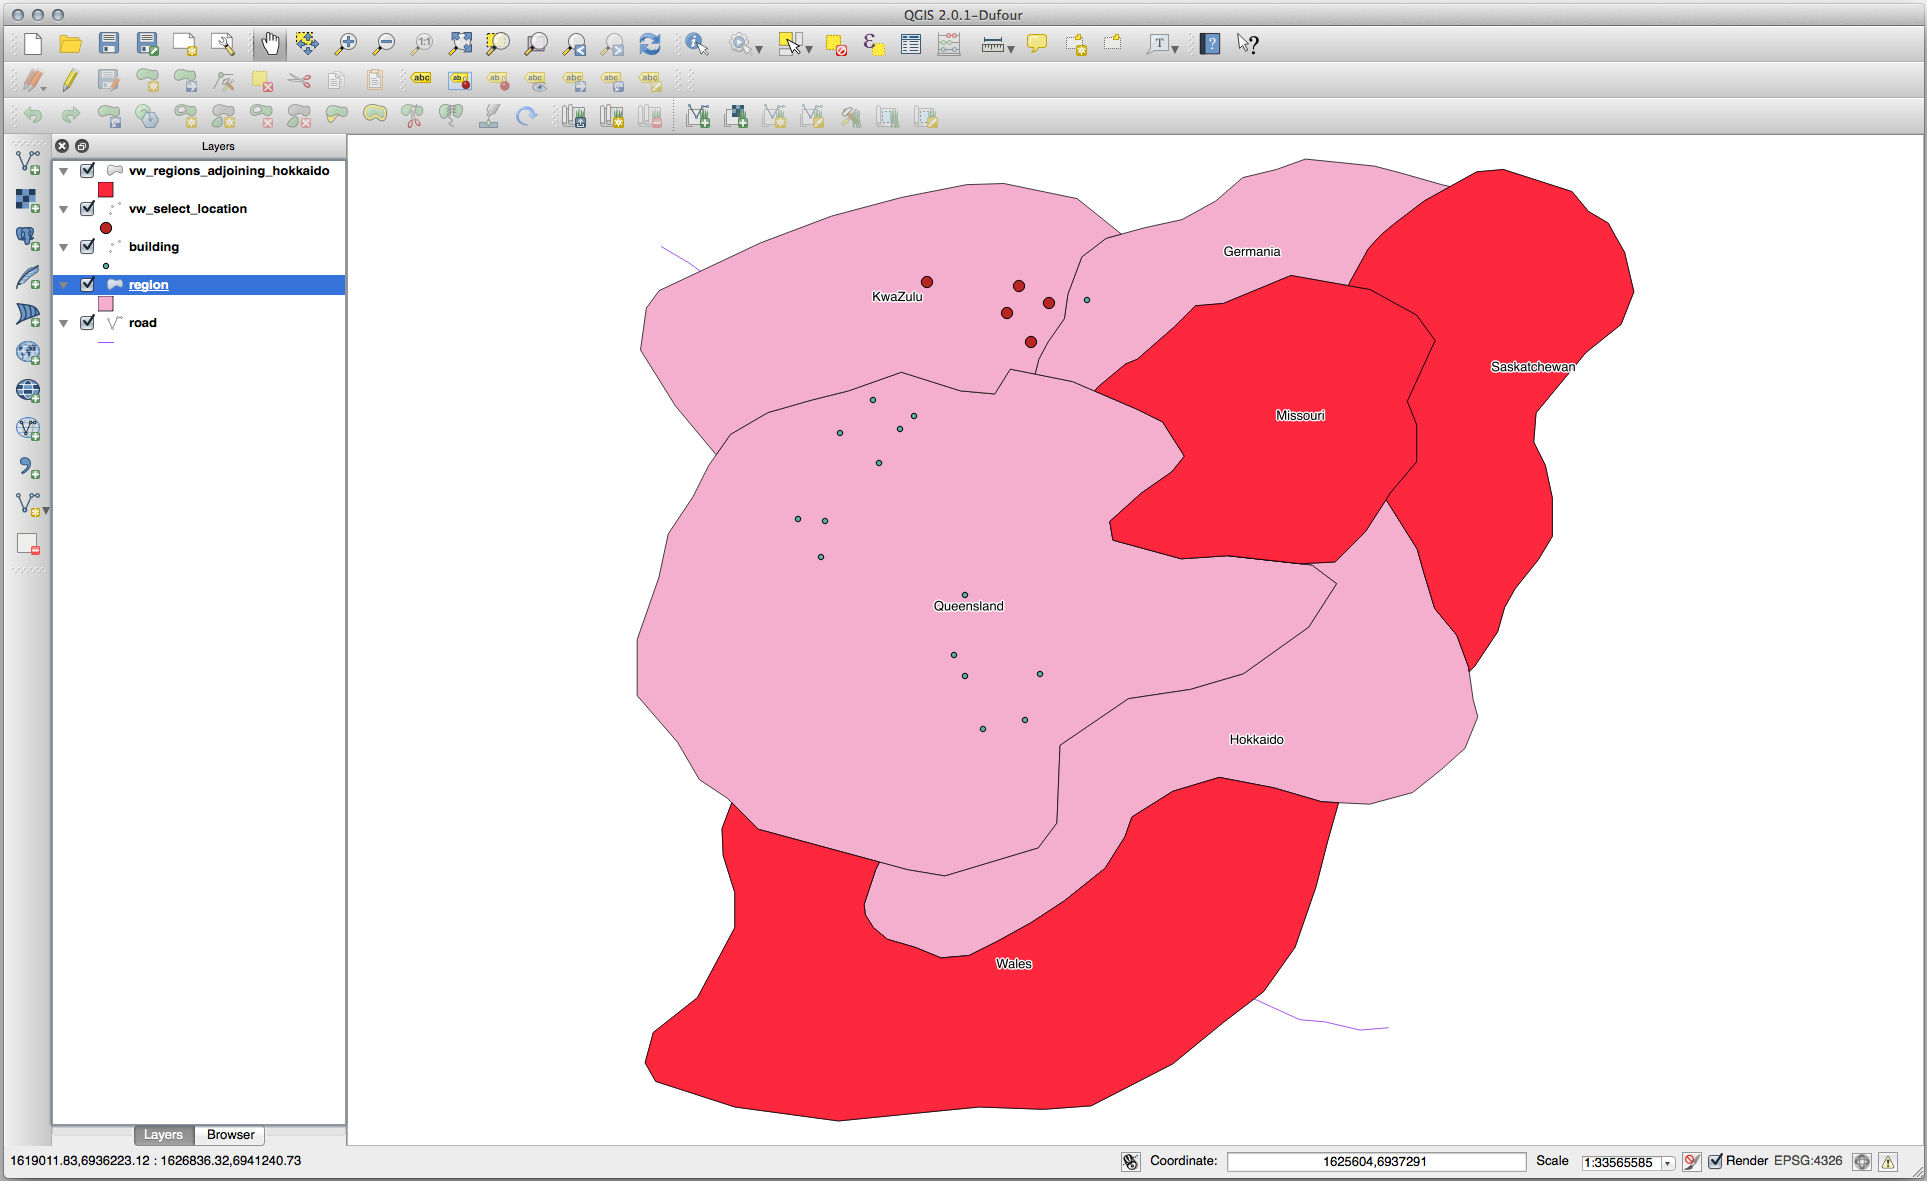
ပျောက်နေသော region (Queensland) ကို သတိထားကြည့်ပါ။ ထိုသို့ဖြစ်ရခြင်းမှာ topology အမှားကြောင့်ဖြစ်နိုင်ပါသည်။ ထိုကဲ့သို့သော အပြစ်အနာအဆာများသည် data ထဲတွင် ပြဿနာများဖြစ်လာနိုင်ပါသည်။ Data များတွင်ရှိနိုင်သော မူမမှန်မှုများ (anomalies) ထဲတွင် ရှာဖွေခြင်းမပြုပဲ ထိုပြဿနာကိုဖြေရှင်းရန် buffer intersect တစ်ခုကို အသုံးပြုနိုင်ပါသည်-
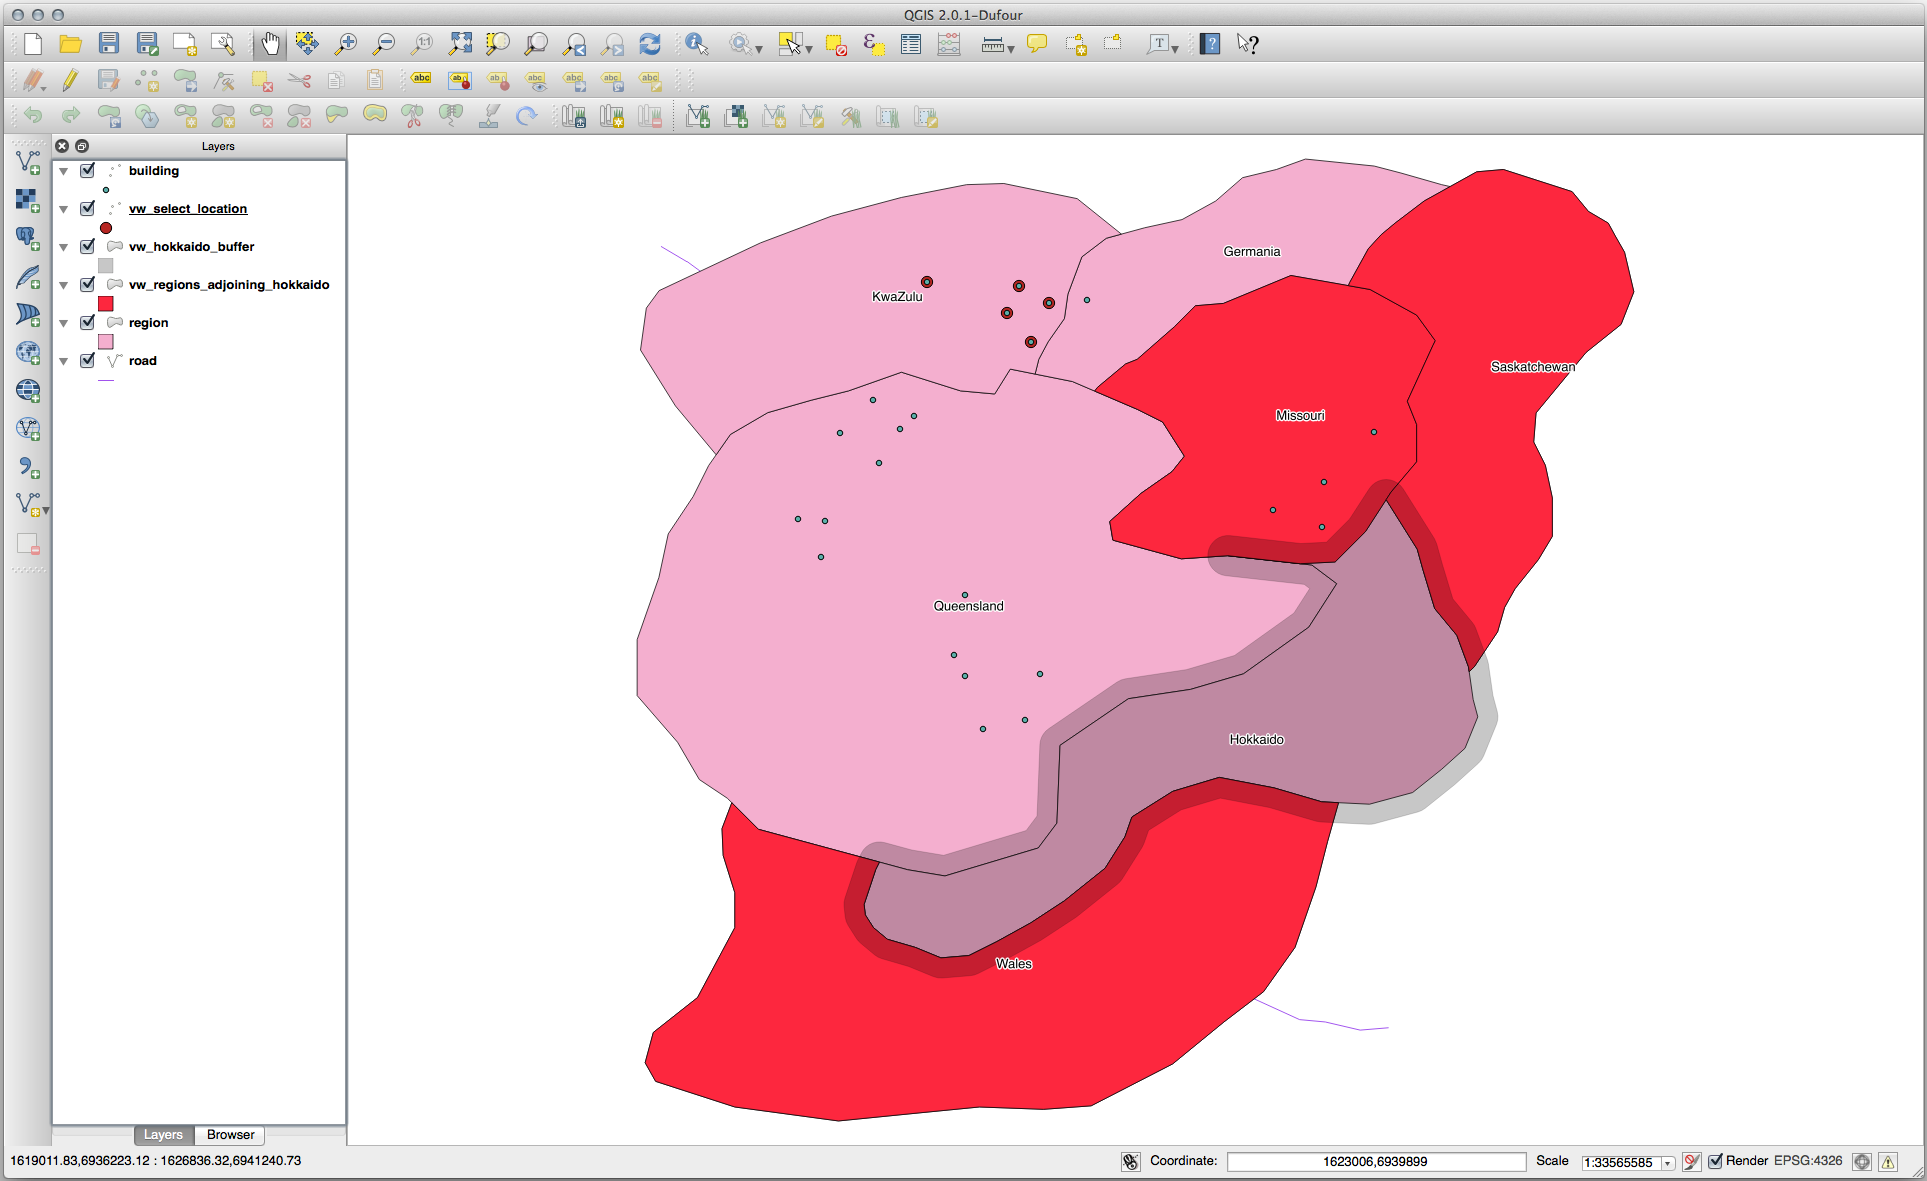
CREATE VIEW vw_hokkaido_buffer AS
  SELECT gid, ST_BUFFER(the_geom, 100) as the_geom
    FROM region
      WHERE name = 'Hokkaido';
အထက်ပါ code သည် Hokkaido region ၏ပတ်လည်တွင် မီတာ ၁၀၀ buffer တစ်ခုကို ဖန်တီးပေးပါသည်။
မှောင်နေသောဧရိယာသည် buffer ဖြစ်ပါသည်-
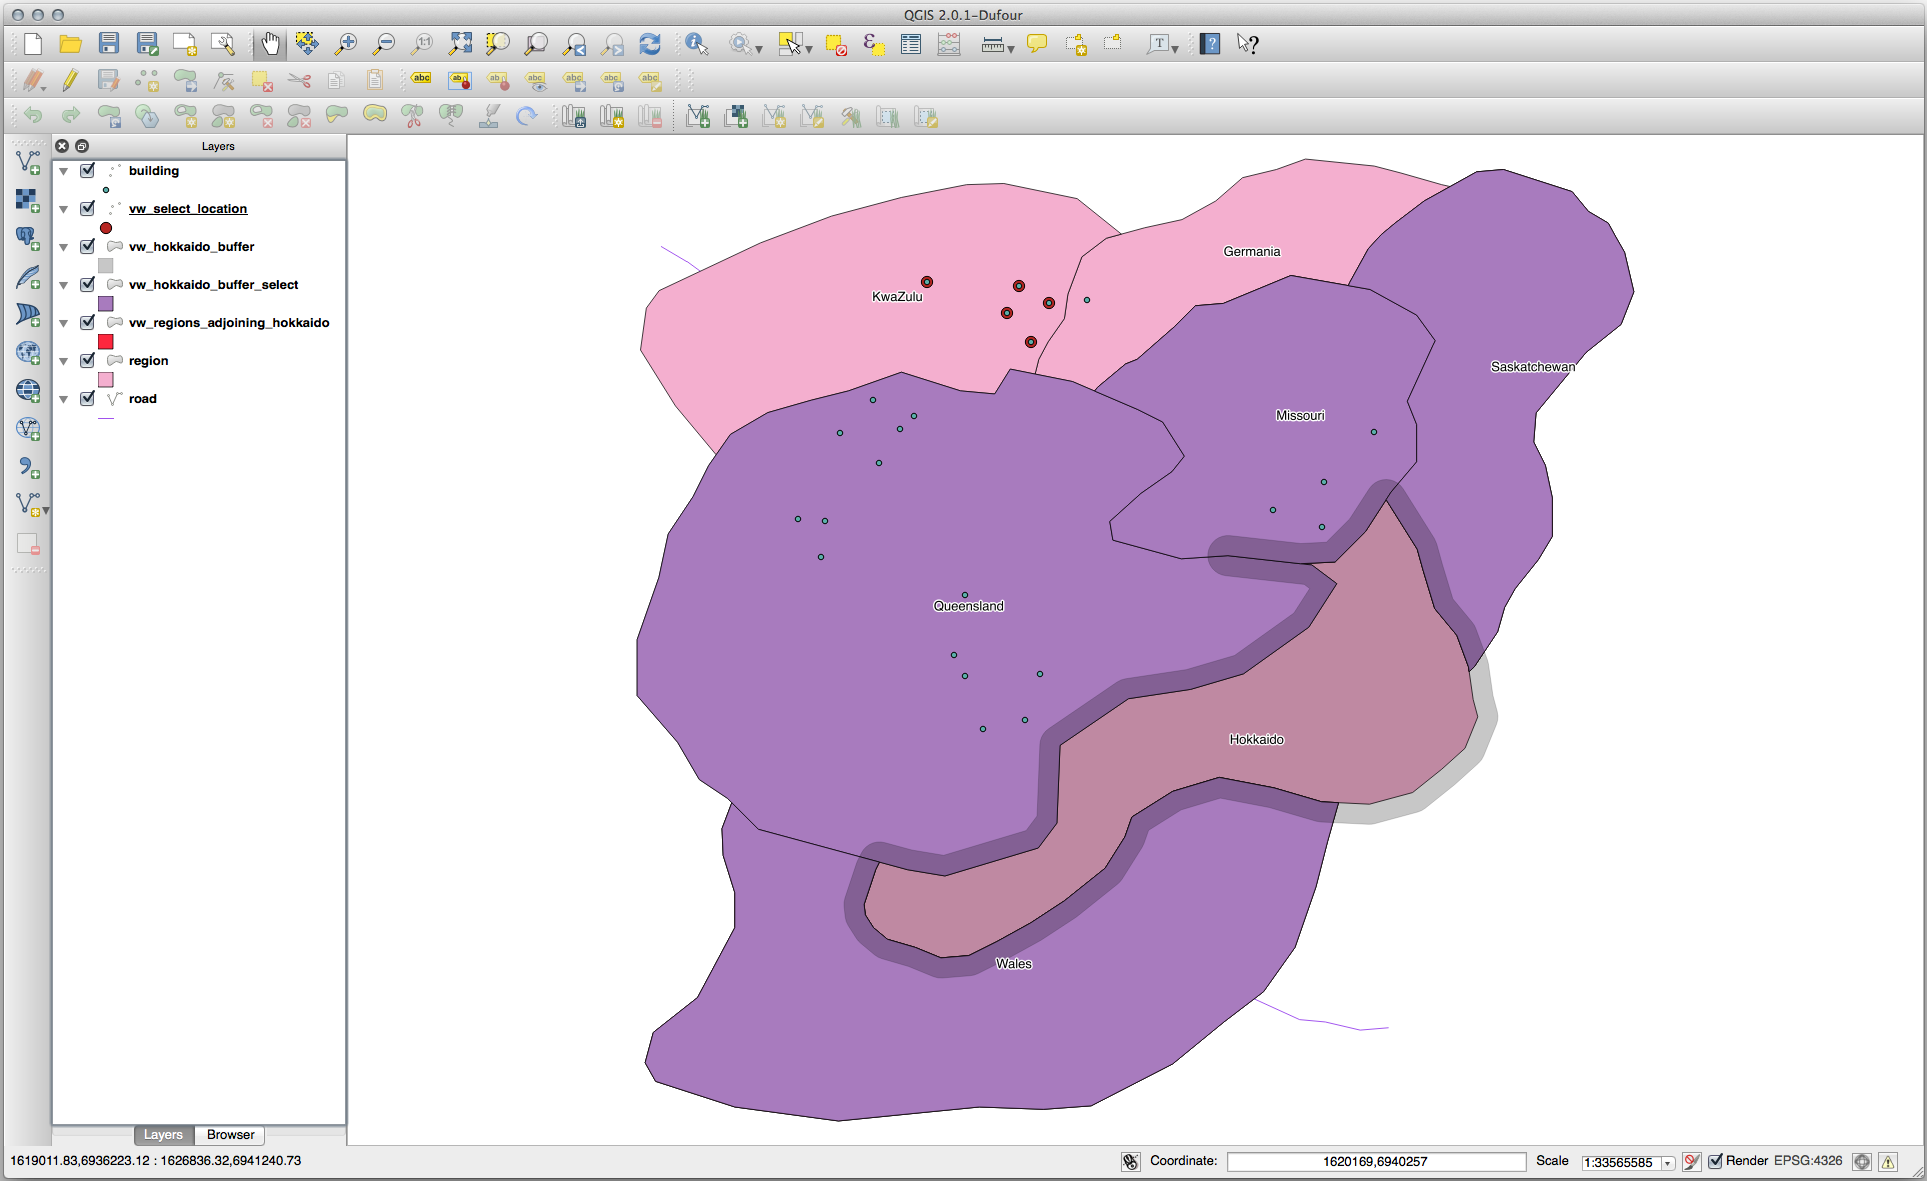
Buffer ကိုအသုံးပြုပြီး Select လုပ်ပါ-
CREATE VIEW vw_hokkaido_buffer_select AS
  SELECT b.gid, b.name, b.the_geom
    FROM
    (
      SELECT * FROM
        vw_hokkaido_buffer
    ) a,
    region b
    WHERE ST_INTERSECTS(a.the_geom, b.the_geom)
    AND b.name != 'Hokkaido';
ဤ query ထဲတွင် မူရင်း buffer view ကို အခြား table တစ်ခုခုကဲ့သို့ အသုံးပြုပါသည်။ ၎င်းကို Alias (အခြားအမည်) a ဟု ပေးထားပြီး ၎င်း၏ဂျီဩမေတြီ field ကို a.the_geom ဟုပေးထားကာ ၎င်းနှင့်ထိဖြတ်သွားသော region table (alias b) ထဲရှိ polygon တစ်ခုခုကို select ပြုလုပ်ရန် အသုံးပြုပါသည်။ သို့သော် Hokkaido ကိုယ်တိုင်သည် ဤ select statement တွင်ပါဝင်ခြင်းမရှိပါ၊ Hokkaido ကိုမလိုချင်ပဲ ၎င်းနှင့်ဆက်နေသော region များကိုသာ လိုချင်သောကြောင့်ဖြစ်သည်။
QGIS ထဲတွင်-
Buffer တစ်ခုဖန်တီးရန်မလိုပဲ ပေးထားသော အကွာအဝေးတစ်ခုအတွင်းရှိ object များအားလုံးကိုလည်း select ပြုလုပ်နိုင်ပါသည်-
CREATE VIEW vw_hokkaido_distance_select AS
  SELECT b.gid, b.name, b.the_geom
    FROM region a, region b
      WHERE ST_DISTANCE (a.the_geom, b.the_geom) < 100
      AND a.name = 'Hokkaido'
      AND b.name != 'Hokkaido';
Buffer ဖန်တီးရန်မလိုအပ်ပဲ တူညီသောရလာဒ်ကို ရရှိစေပါသည်-
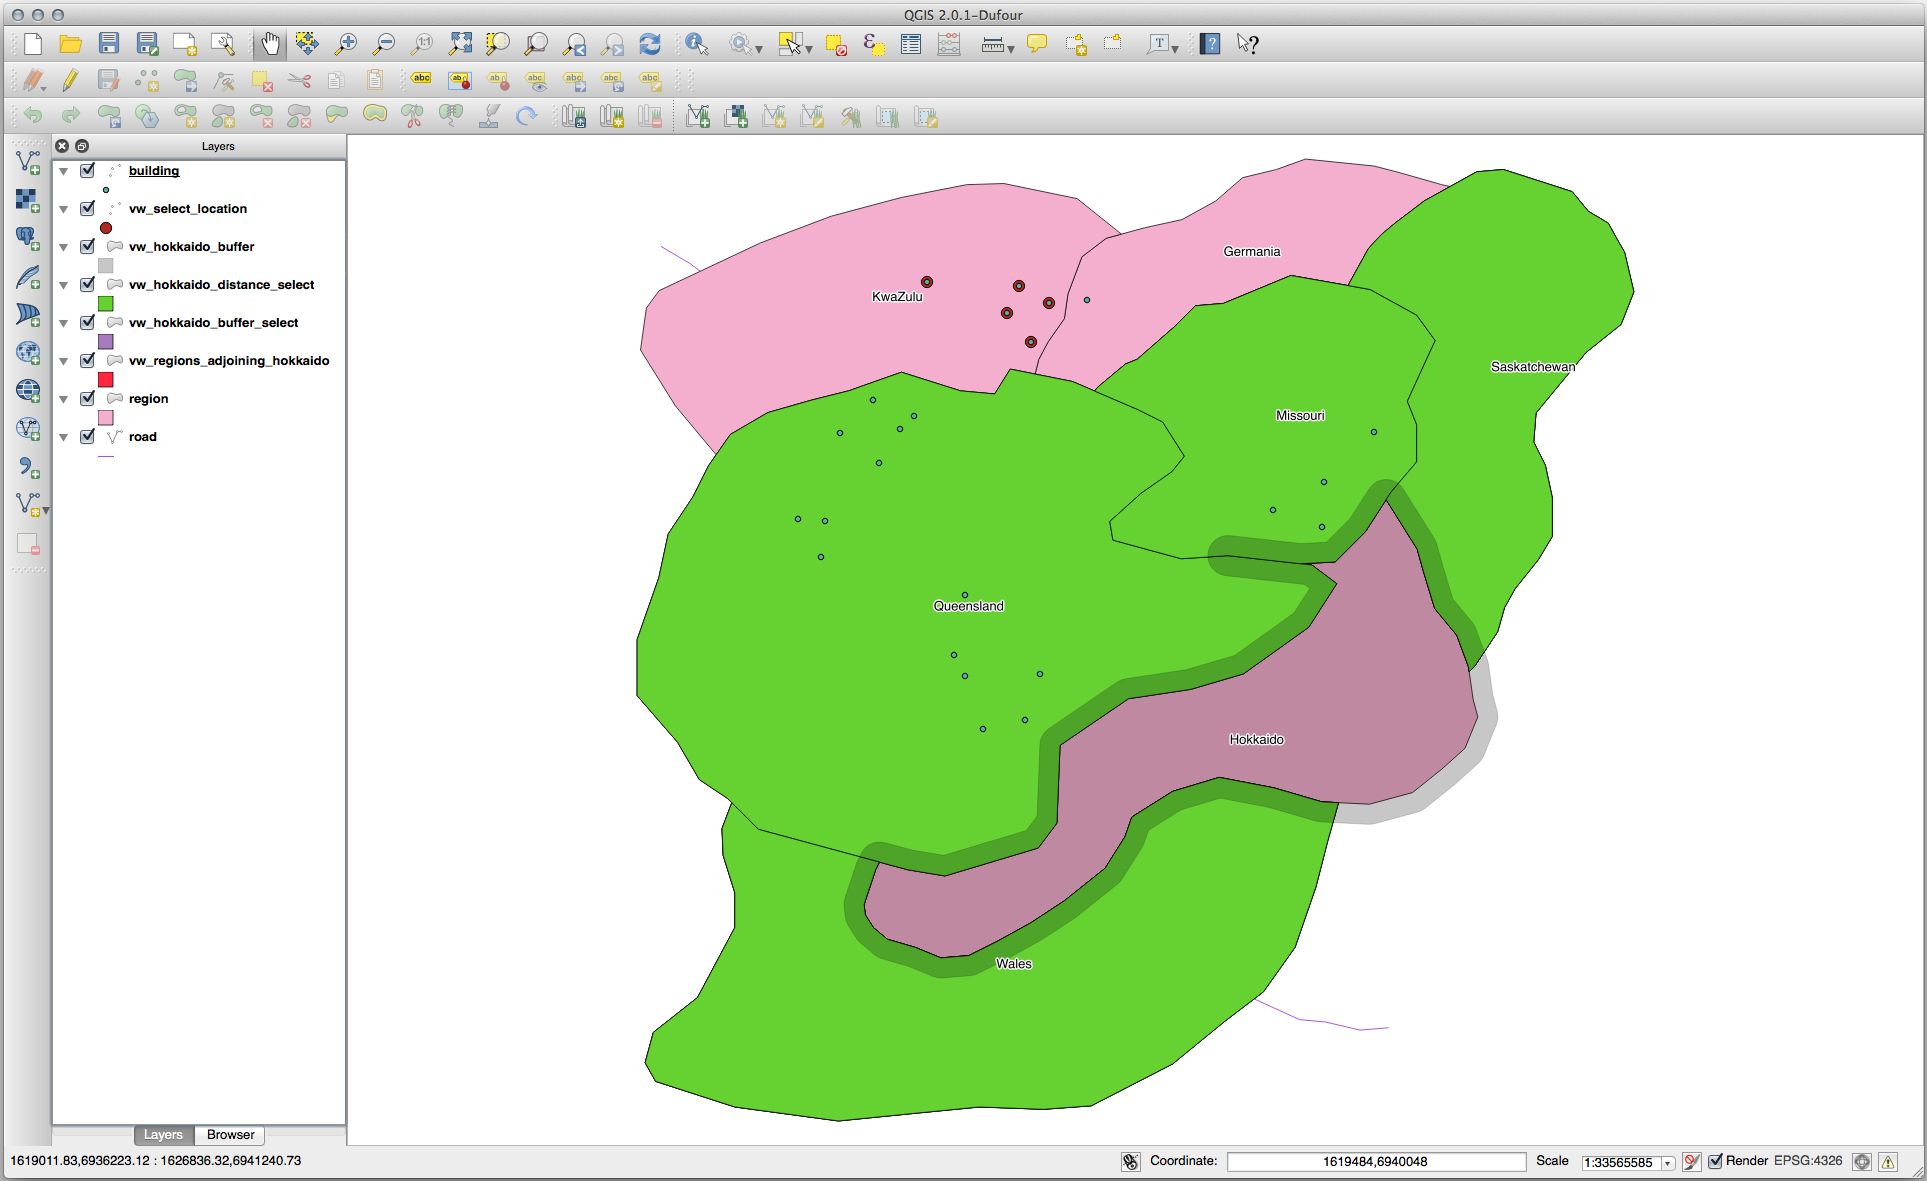
သီးသန့်ဖြစ်သော တန်ဖိုးများကို ရွေးချယ်ခြင်း (Select unique values)
Queensland region ထဲရှိ အဆောက်အဦများအားလုံးအတွက် unique ဖြစ်သော မြို့နာမည်များစာရင်းကို ပြသပါ-
SELECT DISTINCT a.name
  FROM building a, region b
    WHERE st_within(a.the_geom, b.the_geom)
    AND b.name = 'Queensland';
ရလာဒ်-
  name
---------
 Beijing
 Berlin
 Atlanta
(3 rows)
နောက်ထပ်ဥပမာများ …
CREATE VIEW vw_shortestline AS
  SELECT b.gid AS gid,
        ST_ASTEXT(ST_SHORTESTLINE(a.the_geom, b.the_geom)) as text,
        ST_SHORTESTLINE(a.the_geom, b.the_geom) AS the_geom
    FROM road a, building b
      WHERE a.id=5 AND b.id=22;

CREATE VIEW vw_longestline AS
  SELECT b.gid AS gid,
         ST_ASTEXT(ST_LONGESTLINE(a.the_geom, b.the_geom)) as text,
         ST_LONGESTLINE(a.the_geom, b.the_geom) AS the_geom
    FROM road a, building b
      WHERE a.id=5 AND b.id=22;
CREATE VIEW vw_road_centroid AS
  SELECT a.gid as gid, ST_CENTROID(a.the_geom) as the_geom
    FROM road a
      WHERE a.id = 1;

CREATE VIEW vw_region_centroid AS
  SELECT a.gid as gid, ST_CENTROID(a.the_geom) as the_geom
    FROM region a
      WHERE a.name = 'Saskatchewan';
SELECT ST_PERIMETER(a.the_geom)
  FROM region a
    WHERE a.name='Queensland';

SELECT ST_AREA(a.the_geom)
  FROM region a
    WHERE a.name='Queensland';
CREATE VIEW vw_simplify AS
  SELECT gid, ST_Simplify(the_geom, 20) AS the_geom
    FROM road;

CREATE VIEW vw_simplify_more AS
  SELECT gid, ST_Simplify(the_geom, 50) AS the_geom
    FROM road;
CREATE VIEW vw_convex_hull AS
  SELECT
    ROW_NUMBER() over (order by a.name) as id,
    a.name as town,
    ST_CONVEXHULL(ST_COLLECT(a.the_geom)) AS the_geom
    FROM building a
    GROUP BY a.name;
16.4.5. နိဂုံးချုပ် (In Conclusion)
PostGIS မှ database function အသစ်များကို အသုံးပြုပြီး spatial object များကို query ပြုလုပ်နည်းကို လေ့လာခဲ့ရခြင်းဖြစ်ပါသည်။
16.4.6. နောက်ထပ်ဘာအကြောင်းအရာလဲ (What’s Next?)
နောက်လာမည့်သင်ခန်းစာတွင် ပိုမိုရှုပ်ထွေးသော ဂျီဩမေတြီများ၏တည်ဆောက်ပုံကို စူးစမ်းလေ့လာမည်ဖြစ်ပြီး PostGIS အသုံးပြု၍ ၎င်းတို့ကို မည်သို့ဖန်တီးရမည်ကို လေ့လာမည်ဖြစ်ပါသည်။